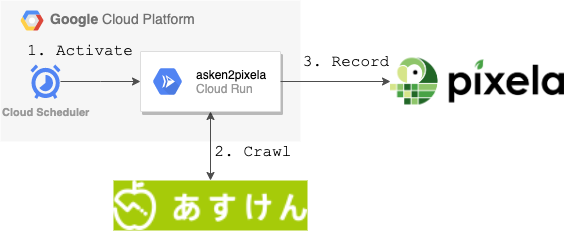
つくるもの
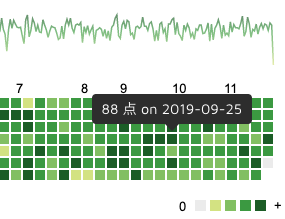
転記の結果
つまづきメモ
AWS LambdaをやめてGCP Cloud Runを選択
- まず最初に,ローカルでPuppeteerを用いてaskenをcrawl → pixelaへ記録する機能を開発
- これをベースにPuppeterr on Lambdaでサーバーレスな定期クロールを実現するつもりだった
- が,
Page.$$eval()の返り値が通常のPuppeteerとLambda用のPuppeteerとで違った…- 通常のPuppeteer:
Array<Element>が返ってきた - Lambda用のPuppeteer:
Array<ElementHandle>が返ってきた
- 通常のPuppeteer:
- このギャップを埋める修正が面倒なので,ローカルで動いているコード(=普通のPuppeteer)をサーバーレスで動かせばいいのでは? → Cloud Runがある!
- Cloud Run: リクエストに応じてコンテナを起動・処理するサーバーレスなGCPのサービス
Puppeteerのevalなどで渡す関数内処理のロギング
- Puppeteerの
Page.$$eval()などの引数で渡す関数内でconsole.log()でログを取りたかったが,そのまま書いてもスコープが変わるためコンソール出力されない - これに対し,consleイベントをdispatchすることができたため,Pageオブジェクトに対して下記処理を実施し,
Page.$$eval()内のログ出力に成功
const browser = await puppeteer.launch();
const page = await browser.newPage();
page.on('console', consoleMessageObject => function (consoleMessageObject) {
    if (consoleMessageObject.type() !== 'warning') {
        console.debug(consoleMessageObject.text())
    }
});

await page.goto('https://google.com');
const result = await page.evaluate(() => {
    console.log('Browser scope.');
    return 'Normal scope.';
});
console.log(result)
その他細かいところ
- Dockerfileで
AZを指定しないと日付がUTCで処理される- Cloud SchedulerがJST 11/23 1:00に起動しても,UTC 11/22 16:00で処理が進む
- TypeScriptアプリをDockerに乗せるときの作法を知らない…
- とりあえず今回はローカルでトランスパイルして,生成された
index.jsだけをDockerにのせた
- とりあえず今回はローカルでトランスパイルして,生成された
開発環境
GCPアカウント/プロジェクトは作成済みとする.
$ gcloud version
Google Cloud SDK 271.0.0
beta 2019.05.17
bq 2.0.50
core 2019.11.08
gsutil 4.46

$ yarn --version
1.19.1

$ tsc --version
Version 3.6.4
開発詳細
1. Puppeteer on Cloud Runの動作確認
Expressでリクエストを受けてPuppeteerを実行する設定・プログラムを準備
- package.json
{
  "name": "asken2pixela-cloudrun",
  "version": "1.0.0",
  "description": "asken2pixela on GCP Cloud Run",
  "main": "index.js",
  "scripts": {
    "start": "tsc -p . && node .",
    "build": "tsc -p .",
    "server": "node index.js"
  },
  "author": "",
  "license": "MIT",
  "dependencies": {
    "express": "^4.17.1",
    "puppeteer": "^2.0.0"
  },
  "devDependencies": {
    "@types/express": "^4.17.2",
    "@types/puppeteer": "^1.20.2",
    "typescript": "^3.7.2"
  }
}
- index.ts
import puppeteer from 'puppeteer'
import express from "express";

const app = express();

const askenUrl = 'http://asken.jp/login'; // put your own target

app.get('/', async (req, res) => {
  console.log('Request received');

  const browser = await puppeteer.launch();
  const page = await browser.newPage();
  await page.goto(askenUrl);
  const title = await page.title();
  await page.close();

  // response message with web page title
  res.send(`Access to ${title}`);
});

const port = process.env.PORT || 8080;
app.listen(port, () => {
  console.log('Listening on port', port);
});
- Dockerfile
# Use the official lightweight Node.js 10 image.
# https://hub.docker.com/_/node
FROM node:10-slim

# Create and change to the app directory.
WORKDIR /usr/src/app

# Copy application dependency manifests to the container image.
COPY package.json yarn.lock ./

# Install latest chrome dev package and fonts to support major charsets (Chinese, Japanese, Arabic, Hebrew, Thai and a few others)
RUN wget -q -O - https://dl-ssl.google.com/linux/linux_signing_key.pub | apt-key add - \
    && sh -c 'echo "deb [arch=amd64] http://dl.google.com/linux/chrome/deb/ stable main" >> /etc/apt/sources.list.d/google.list' \
    && apt-get update \
    && apt-get install -y google-chrome-unstable fonts-ipafont-gothic fonts-wqy-zenhei fonts-thai-tlwg fonts-kacst fonts-freefont-ttf \
      --no-install-recommends \
    && rm -rf /var/lib/apt/lists/*

# Install puppeteer so it's available in the container.
RUN yarn add puppeteer \
    # Add user so we don't need --no-sandbox.
    # same layer as npm install to keep re-chowned files from using up several hundred MBs more space
    && groupadd -r pptruser && useradd -r -g pptruser -G audio,video pptruser \
    && mkdir -p /home/pptruser/Downloads \
    && chown -R pptruser:pptruser /home/pptruser \
    && chown -R pptruser:pptruser ./node_modules

# Set environment variables
ENV TZ Asia/Tokyo
ENV PORT 8080

# Install production dependencies.
RUN yarn install --production

# Copy local code to the container image.
COPY index.js ./
RUN chown -R pptruser:pptruser ./*

# Run everything after as non-privileged user.
USER pptruser

# Run the web service on container startup.
EXPOSE 8080
CMD [ "yarn", "run", "server" ]
- DockerでPuppeteerを動かすときの参考: puppeteer/troubleshooting.md at master GoogleChrome/puppeteer GitHub
用意したものをデプロイ
$ yarn install

# build TypeScript code
$ yarn build

# push Dockerfile to GCP
$ gcloud builds submit --tag gcr.io/<your-projectr-id>/<your-image-name>

# create Cloud Run (Puppeteerを動かすため,メモリサイズを512Mに設定)
$ cloud beta run deploy <your-cloudrun-name> --image gcr.io//<your-projectr-id>/<your-image-name> --platform managed --region asia-northeast1 --allow-unauthenticated --memory 512Mi
- 最後にCloud Runのエンドポイントが表示されるのでメモしておく
- 当該URLにブラウザアクセス or
curlで動作確認可能
- 当該URLにブラウザアクセス or
2. Cloud Schedulerの作成・動作確認
毎日AM1:00に上記Cloud Runを実行するCloud Schedulerジョブを作成しテスト実行
# create Cloud Scheduler job
$ gcloud scheduler jobs create http <your-job-name> --schedule "00 01 * * *" --time-zone "Asia/Tokyo" --http-method=GET --uri="<your-cloudrun-endpoint>" --headers=Content-Type=application/json

# test run
$ gcloud scheduler jobs run <your-job-name>
- その後Cloud Run, Cloud Schedulerのログを確認し動作確認
3. Puppeteer処理の実装
利用パッケージ追加
$ yarn add axios
メイン処理
長いので下記参照 (puppeterでcrawlして取得した結果をaxiosでpostしてるだけ) asken2pixela/index.ts GitHub
Dockerfileに環境変数設定を追加
...
# Set environment variables
ENV TZ Asia/Tokyo
ENV PORT 8080
ENV ASKEN_URL http://asken.jp/login
ENV ASKEN_EMAIL <your-login-email-address
ENV ASKEN_PASS <your-login-password>
ENV PIXELA_USER <your-pixela-user-id
ENV PIXELA__GRAPH <your-pixela-graph-id
ENV PIXELA_TOKEN <your-pixela-token>
...
再デプロイ
# build & push Dockerfile to GCP
$ yarn build && gcloud builds submit --tag gcr.io/<your-projectr-id>/<your-image-name>

# create Cloud Run (Puppeteerを動かすため,メモリサイズを512Mに設定)
$ cloud beta run deploy <your-cloudrun-name> --image gcr.io//<your-projectr-id>/<your-image-name> --platform managed --region asia-northeast1 --allow-unauthenticated --memory 512Mi
完成!